
WOW! July 25th!?!? No way! How was my last post in JULY!?!?
Sadly my non-stampin' life jumped into hyper drive and I haven't had much of a chance to finish my projects, let alone post them here. (Notice I still have the link to the Summer Mini posted...Lord, color me embarrassed.)
With the end of the year comes a deep breath, a whispered "Thank you God for getting me through the last six months" and a slow circle around my scraproom to take in the damage that half finished projects, the attempted project graveyard, and the apparent cyclone caused. It also brings a revitalized vision and a hope and prayer I can pull it off.
Tomorrow I have my Christmas cards to show you (yay!) and then later in the week I have some of the presents I've created for my family. After that? Well...after that I have plans (which could also be loosely translated into 'Delusions of Grandeur'.)
Give me through Christmas.....then I promise I'll be back.
Now, go get inky!
Gabbie
PS: We're no longer under construction.....you know, aside from those embarrassment inducing outdated mini catalogs. ;)
Sunday, December 19, 2010
Sunday, July 25, 2010
Site Updates
 Hi There! If you notice that (*GASP*) my page isn't as matchy-matchy as usual, don't fret. I'm just in the middle of a blog update. I'm working on creating my blog background (done) and new banner (in progress) through My Digital Studio from Stampin' Up, so things may be wonky for the next few days while I figure it out. Thanks for your support, and I'll see you when the reno is done!!
Monday, July 19, 2010
My Stampin' Story....Love What You Do
My Stampin Story starts about as far away from stamping and card making as possible...I was a scrapbooker who hadn't scrapped a page in over 2.5 years and I was obviously quite behind. I hadn't "made a card" since I was a kid for my parents, and I felt so overwhelmed, I didn't know how to get back into it. I knew that I needed a creative outlet, and I knew I needed to take the plunge. A friend of mine invited me to one of her monthly crops, and I decided to jump back in with both feet. At that crop, I was introduced to a handy little machine called a Cricut, and the next eight months or so passed by in an eBay-induced whirlwind. (whoopsie!)
I was a member of the Cricut Messageboards, and was always on the lookout for tips and tricks for my new toy. I kept hearing about Stampin' Up papers and how wonderfully they cut in the Cricut, and wait...there was matching ink, markers and ribbon? Well, that was too much for my little Organizational OCD brain to handle. Sign. Me. Up. Matchy-Matchy = Heaven. :D
I participated in a few online clubs with various demos on the messageboard, and ended up developing a great friendship with one in particular...this demonstrator eventually became my upline when I decided to bit the bullet this past January and sign up during Sale-A-Bration. We live on opposite sides of the country, and have never met in person, but she's become one of my dearest friends, along with my sidelines, who are also spread across the country. I love how a product can bring people across the country together, who never would have met otherwise.
As for being a Demonstrator, I really signed up with the fullest intentions of only being a hobby demo....someone who really is their own best customer and who doesn't focus on Stampin' Up as a business. Oddly though, at the same time I was signing on the dotted line, I started getting emails from friends and aquantances about card techniques and scrapbooking ideas. This was when I realized that I might be able to do something productive with my obsession/hobby. I hosted my first Open House at the end of January to introduce my friends and family to SU, and from that Open House, my monthly Sunday Scrappers technique class was born.
A mere six months later and I'm having a great time teaching classes and introducing new people to the joys of Stampin Up and their fantastic products. I make extra money to help out my famiily and to help fuel my obsession/hobby. ;) I originally purchased Stampin' Up products because of their quality and their customer service. I chose to become a demonstrator because I believe in those products and honestly think they're the best out there. I continue to love what I do as a Demonstrator because of the friendships I've made and because there is something so fulfilling about staring at a blank piece of cardstock and watching it come to life in front of your eyes. There's something even more fulfilling about teaching others how to discover that for themselves.
Wednesday, July 14, 2010
Why I Love Stampin' Up!
I'm taking part in a program through Stampin Up that, for me, is really making me think about why I signed up to be a Demonstrator and why I stay. As I thought about my reasons, I created the design below in My Digital Studio as a visual to help me remember my goals. So, what is my why? My Why is two-fold. I originally signed up to be a demonstrator to save some money on the products I already loved. (I'll be posting My Story for your enjoyment in the next day or so) I honestly didn't believe I'd ever make any money at it. Now, while I can't give up my "day job" to be a full-time stampin' queen (yet!), I am proud to say that this little savings plan of mine is actually helping around our home. For example, my sales in June enabled me to buy my son his first big-boy bicycle for his birthday. So that's my first why....to be able to help my family (while still supporting this habbit - I mean hobby - of mine.
My second Why is the friendships I have built in my short six months as a Demonstrator. My Upline and Sidelines have become some of my dearest friends, even though we live thousands of miles apart. My customers and club members have become friends, and the ones that were my friends before have become my Stampin' family. I love the time I get to spend with them each month and love getting to share my love of stamping, scrapping and crafting.
These are the reasons I do what I do, and why I love it. Thank you for letting me share with you. I hope you find inspiration everywhere you turn! Now, go get inky!
 So, what is my why? My Why is two-fold. I originally signed up to be a demonstrator to save some money on the products I already loved. (I'll be posting My Story for your enjoyment in the next day or so) I honestly didn't believe I'd ever make any money at it. Now, while I can't give up my "day job" to be a full-time stampin' queen (yet!), I am proud to say that this little savings plan of mine is actually helping around our home. For example, my sales in June enabled me to buy my son his first big-boy bicycle for his birthday. So that's my first why....to be able to help my family (while still supporting this habbit - I mean hobby - of mine.
My second Why is the friendships I have built in my short six months as a Demonstrator. My Upline and Sidelines have become some of my dearest friends, even though we live thousands of miles apart. My customers and club members have become friends, and the ones that were my friends before have become my Stampin' family. I love the time I get to spend with them each month and love getting to share my love of stamping, scrapping and crafting.
These are the reasons I do what I do, and why I love it. Thank you for letting me share with you. I hope you find inspiration everywhere you turn! Now, go get inky!
Sunday, July 11, 2010
July 25th Stationary Box Class
This month's class is going to be SO MUCH FUN! I found this awesome Stationary Box over at SplitCoastStampers, and I knew I had to try it so I could share it with my customers! This fantastic little box, once complete, includes 4 standard A2 cards/envelopes, 4 3"x3" cards and envelopes, 4 gift tags, and a customized pen!
 Here's a photo of the box all closed up and the three items that come with the box. I used the Elegant Soiree Designer Series Paper and Thoughts and Prayers, Because I Care and Vintage Vogue stamp sets for this project.
 Here is the open box. On the part that folds down, there is a small notebook and a little spot for stamps. Love it! I really enjoyed this project, and I'm sure my customers will too!
Have a great day, be inspired, and get inky!!
July 18th Workshop Cards
I'm so excited for my IB&C Catalog Launch Workshop next Sunday! Here are the projects we'll be creating! My workshops are all hands on, meaning that each guest will make each of these three cards. I hope they like them!!
 This card you have seen before during my sneak peak countdown. I heard some great comments from my customers about it, so we've added it to the roster for the workshop!
 This card pairs the Season of Friendship stamp set with the brand new Brights Designer Buttons! This card was inspired by and combo-cased from two fantastic cards made by fellow Demonstrator Mary Brown. You can see her work at http://stampercamper.com.
  I absolutely LOVE the Sweet Treat Cups and the various stamp sets that go with them. I used the set Sweet Centers here to make this fun little hot air balloon. (Note: This card was made using a retired ribbon, but the cards made in the workshop will be made using current 5/8" Real Red Grosgrain ribbon.) I'll also be teaching my guests how to make their card refillable so it won't get destroyed when trying to get the candy out.
It's going to be a very fun workshop for sure! I hope my guests have as much fun making them as I did!
Have fun, be inspired, and get inky!
Monday, July 5, 2010
NEW Color Renovation Retrofit Kits Now Available!

One of the things I love the most about Stampin' Up is that they are always thinking of how things will affect current die-hard SU lovers when they make changes. In this Color Renovation, they've made Retrofit Kits available for those of us who already have full sets of markers, watercolor crayons, pastels, etc. Click on the photo above to go to the SU PDF of their Retrofit Kit Offerings!
Here's hoping you had a fantastic 4th of July!
Now, go get inky!
Sunday, July 4, 2010
New Punch Style Video!!
The fantastic Stampin' Up punches have updated for 2010!! We've seen the new sleek and streamlined punch design on the new punches available in the Mini catalogs so far this year, but with the launch of then new Idea Book and Catalog, all our favorite punches will be in the new design! This is awesome for anyone who is running out of storage space like I am! :) The great people at the Stampin' Up Home Office have created a video covering some of the highlights of the new punch design. If you click on the photo below, it will take you to the video on the Stampin' Up website!

I absolutely LOVE SU punches, and I'm excited to see what the new punch design allows SU to bring us!! There are brand new punches in the new IB&C, and I'm hoping we'll see some others in the upcoming Mini Catalogs!
Happy Stamping! Now go get inky!!
I absolutely LOVE SU punches, and I'm excited to see what the new punch design allows SU to bring us!! There are brand new punches in the new IB&C, and I'm hoping we'll see some others in the upcoming Mini Catalogs!
Happy Stamping! Now go get inky!!
Thursday, July 1, 2010
It's Here! It's Here!

If you haven't already, you can click on the photo of the catalog to the right of this post, and it will take you to the Catalog PDF. You can also click on my Shop SU 24/7 button and that will take you directly to my SU Website, so you can shop til you drop! I love SO MUCH about this catalog, and I simply cannot wait to show you more!!
Have a fantastic day, and enjoy!
Wednesday, June 30, 2010
It's Almost Time!!
I'm so excited for the new Idea Book and Catalog to go Live tomorrow! All the excitement happens at Noon Mountain Time, so if you're able, come play with us online tomorrow! Also, make sure you snatch up any remaining Last Chance List items that you can't live without tonight before Midnight Mountain time...otherwise they'll be all gone!
Here is our final Sneak Peak!

Look at that, it's Daffodil Delight again! This card is using the same Greenhouse Gala Designer Series paper that we used earlier in the week, but this is a completely different color combination. This bright and sunny combo is using Daffodil Delight with Pumpkin Pie. The flowers are actually cut out from one of the other sheets of DSP in the pack! I just inked the edges of the flowers with some Pumpkin Pie ink to make them pop and then added some Old Olive leaves and some Whisper White Organza Ribbon. (Want to know where those perfect little leaves came from? They're the wings from the 2 Step Bird Punch!!)
Card Recipe:
Daffodil Delight, Pumpkin Pie, Old Olive and Whisper White cardstocks
Greenhouse Gala DSP
Pumpkin Pie and Old Olive Classic Inks
Whisper White Organza Ribbon
Large Oval Punch
Scallop Oval Punch
2 Step Bird Punch (leaves)
Occasional Quotes Level 3 Hostess Stamp Set
I hope you enjoy this card and that you find something to inspire you everyday!! Now, go get inky!
Tuesday, June 29, 2010
36(ish) Hours to go!!
It's almost time!! On a side note, I simply cannot believe June is over! If June is over, then that means that my Little Man is going to be FOUR next week. This mommy is soooooo not ready for a four year old. Expecially since he has Daddy's sarcasm and Mommy's attitude already. I am in so much trouble with this kid. LOL!
Anyway...since we only have about another 24 hours left in June, I wanted to make sure to remind you to check out the Last Chance list one more time! You may see something you overlooked before but HAVE to have, so it never hurts to look, right? Well, it hurts the wallet, but that's a good hurt....especially when the goodie box arrives! On to our Sneak Peak!!
 I LOVE Punch Art!!! I'm kind of a newer Demonstrator, so this may have been around for a bajillion years, but it seems like punch art is all the rage right now! Once I saw these adorable little pansies on the Demonstrator website I knew I had to make them! I wish I could give credit to the originator of the idea to use the BUTTERFLY PUNCH to make the pansy, but I've seen so many samples now, that I don't know who it was. If I could, I would give her (or him) a standing ovation, because this idea was GENIUS!
Sneaky Peaky Goodness - Yes, you're right, that's Daffodil Delight in the center of the flowers (I told you it was my newest favorite color.) You'll also see the brand new Scallop Rectangle Clearlit die for the Big Shot. The biggest selling factor on this for me? It has a clear window so you can see through the die! That means - if you're like me and are too impatient to drag out your stamp-a-ma-jig every time you want to stamp something (even when you know it'll take more time to restamp the straight image anyway) - you can stamp your sentiment onto your paper and then line up the die over it. It's like stamping and then using a coordinating punch, but with the Big Shot!! I think it's perfect with another Sneak Peak here, the Level 3 Hostess set Occasional Quotes. I LOVE this set! It has some fantastic sentiments that cover a range of occasions. I think it's a must have, and you could get it for FREE if you host a qualifying workshop!!
Card Recipe:
Old Olive and Whisper White Cardstock
Old Olive, Perfect Plum and Daffodil Delight Classic Ink
Basic Black Marker
Butterfly Punch (Pansy Petals)
2 Step Bird Punch (Leaves)
Perfect Polka Dots Textured Embossing Folder
Occasional Quotes Level 3 Hostess Stamp Set
Scallop Rectangle Clearlits Die
1/4" Old Olive Grosgrain Ribbon
I hope you enjoy this project and that you find inspiration in everything you do! Now, go get inky!
Monday, June 28, 2010
It's the Final Countdown!!
The New Idea Book and Catalog is only 2 and a half days away!! (A half because it launches at Noon on 7/1) That means we have only TWO more countdown projects before the launch! *happy dance*
 For today's project, I decided to Keep It Simple St....Stupendous! Right...that's what I meant to whole time. :D I think there are some awesome a la carte stamps in the new catalog, and this Homemade stamp is one of my favorites. I have several people in my life who are supremely fantastic bakers (my mother in law, for instance, is starting her own cake baking business, and my bff Christina makes the most amazing Peanut Butter squares on the planet) and when I saw this stamp, I thought of them immediately. For this project, I made a little gift of some punched out tags (did I forget to mention that this stamp coordinates with the BRAND NEW 2 3/8" Scallop Circle Punch? OMG! I love it!) Anyway....I punched out the stamped images and then attached a length of Sticky Strip to the back, leaving the backing on one side. Now, my fantastic baking friends can attach this tag to the box they deliver their goodies in! I made a simple card to go with the gift. Both use Night of Navy Patterns DSP, and the image was stamped using Night of Navy ink. One of the things I love about the Patterns DSP stacks (they're in Color Collections STACKS now!! *squeal*) is that you can easily create a coordinated and put together ensemble in a matter of minutes!
Project Recipe:
Whisper White Cardstock
Night of Navy Patterns DSP
5/8" Whisper White Grosgrain Ribbon
2 3/8" Scallop Circle Punch
Big Shot Top Note Die
Sticky Strip
3x5" Celophane Bags
I hope you enjoyed this project! Now, go get inky!
Sunday, June 27, 2010
Another Sneak Peak!
Here's our Sneak Peak project for today! I'm calling this a Stationary Suite. This one specifically is the Greenhouse Gala Suite, since it's using the brand new Greenhouse Gala Designer Series Paper in the 2010-2011 Idea Book and Catalog.
 Here are the cards! The Ribbon used on the taller card is actually the Whisper White Organza ribbon dyed with a Chocolate Chip re-inker. I LOVE that our ribbons are dyable!
 These are two sweet little bookmarks, two altered paper clips and a 3"x3" post-it-note holder with a velcro closure. I love how all the colors in the DSP work so well together. I think I love Marina Mist and Pear Pizazz together.
 I love this tote!! This tote comes from a tutorial by Becky Roberts over at http://www.inkingidaho.blogspot.com/. She's tote-ally awesome! (*giggle*) The tote needed to be made out of cardstock for stability, so I used Pear Pizazz cardstock. To give it a pattern, I used Versamark ink and the flourish from Baroque Motifs to create my very own Designer Series cardstock. :)
 Here's the full set together!! I really love how it turned out. I think these Stationary Suites would be a fantastic gift for someone! Now, go get inky!!
Saturday, June 26, 2010
Sneak Peak Saturday!
Here's our Sneak Peak for Saturday!
I took another step away from cards today to try a technique I recently learned about called Faux-Leather. To make these super cute little gum holders, I tore apart a gum package and used it as a template for my cardstock. Then I thought this would make an ADORABLE business card case, but it woas a skosh too small. So I cut my template in half and extended it a bit to make it the right size for my business cards.
 I used Melon Mambo, Pacific Point and Chocolate Chip cardstock for these projects. The Faux Leather technique uses a Versamark ink pad, clear embossing powder and a heat gun to create the shiny leather-like look! I'll do a Tutorial for it soon. :)
Now have some fun and go get inky!!
Sneak Peak Countdown Continues!
Soooooo....my best laid plans of posting daily sneak peak kind of hit a snag yesterday, BUT that means you get TWO Sneak Peak Projects today! Here's the project from Friday!
 These super cute little boxes use some continuing an new cardstock colors together in a fresh color combo that I think I'll be using all summer! I love how a simple little rectangle of cardstock can make Hershey's Nuggets so festive!
 Card Recipe:
 These super cute little boxes use some continuing an new cardstock colors together in a fresh color combo that I think I'll be using all summer! I love how a simple little rectangle of cardstock can make Hershey's Nuggets so festive!
 Card Recipe:
Crumb Cake (formerly known as Kraft), Tempting Turquiose, Rose Red, Pink Pirouette, Pacific Point, and Wild Wasabi cardstock
Tempting Turquiose, Rose Red and Crumb Cake Classic Ink
Punched Posies Stamp Set (Hostess Level 2 Set in the Summer Mini)
Big Shot Matchbox Die
Big Shot Bigz Island Floral Die
Sizzix Square Lattice Embossing Folder
Rhinestone Brads
I hope you enjoy this project! Now go get inky!
Thursday, June 24, 2010
The Final Countdown Continues!
We're less than a week away from the launch of the new catalog!! (I apparently can't do countdown math...) Happy Days are here becasue my shipment of catalogs arrived today!!! So my Sunday Scrappers ladies...get ready to have some fun pouring over the catalog this weekend! On to our Sneak Peak!!
 That's two of our brand new In Colors right there! Say hello to Pear Pizazz and Peach Parfait! They're paired here with Daffodil Delight (did I mention how much I love this new color?) in a refreshing citrus-y combo that is another new favorite of mine. There's also a brand new stamp on this too! I love love LOVE stamps that coordinate with our punches, and SU has brought a stamp set FULL of coordinating images for us!
Card Recipe:
Pear Pizazz, Daffodil Delight and Whisper White Cardstock
Daffodil Delight and Peach Parfait Markers (Colored directly onto the stamp - GREAT way to stretch your color options)
Perfect Punches Stamp Set
Curly Label Punch
I hope you enjoy this sneak peak! Stay tuned for another sneak peak tomorrow! Now, go get inky!!
 That's two of our brand new In Colors right there! Say hello to Pear Pizazz and Peach Parfait! They're paired here with Daffodil Delight (did I mention how much I love this new color?) in a refreshing citrus-y combo that is another new favorite of mine. There's also a brand new stamp on this too! I love love LOVE stamps that coordinate with our punches, and SU has brought a stamp set FULL of coordinating images for us!
 Card Recipe:
Pear Pizazz, Daffodil Delight and Whisper White Cardstock
Daffodil Delight and Peach Parfait Markers (Colored directly onto the stamp - GREAT way to stretch your color options)
Perfect Punches Stamp Set
Curly Label Punch
I hope you enjoy this sneak peak! Stay tuned for another sneak peak tomorrow! Now, go get inky!!
Wednesday, June 23, 2010
8 Days!
Only 8 more days!!! I am seriously SO EXCITED for the new Idea Book and Catalog! My excitement is even more peaked today because my UPS tracking information says my catalog order will be here TOMORROW! My hostesses are going to be soooooo happy that they'll get to drool over the catalogs at Sunday Scrappers this weekend. They'll also get to see this card (and several others in the Countdown) in person....
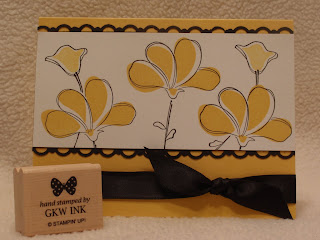

When I first saw the new color Daffodil Delight, I literally oooh'd and aahhhh'd. It's the crispest, prettiest yellow I've seen in a long time. I just love it! I've always loved yellow and black together, and this card oddly came to me while in rush hour traffic one night. I had to write it down on a receipt with a crayon (oh, being a mommy is fun!) so I didn't lose the idea. I hope you enjoy it as much as I did making it!
Card Recipe:
Awash with Flowers Stamp Set (I LOVE this!)
Daffodil Delight and Basic Black Classic Inks
Daffodil Delight, Basic Black and Whisper White Cardstock
Basic Black Satin Ribbon (scrumptious!)
Scallop Trim Border Punch
Stamp-a-ma-Jig (my best friend!)
See you tomorrow for another new project! Now, go get inky!
Tuesday, June 22, 2010
9 Days and Counting!
Can you believe it?? We're only 9 days away from a brand spankin' new Idea Book and Catalog!! In honor of the upcoming NEW NEW NEW Stampin' Up year, I'll be counting down the next 9 days with 9 fantastical projects using new (and some fantastical continuing) products to give you a sneak peak into what's ahead of you this year!! Sooo...here's to Day #9!
 TAAAA-DDDAAAAAA!! OMG, I love the new stamp set Because I Care!! Do you love it? Well, it can be yours FREE, because it's one of the new Level 1 Hostess Stamp sets!! It made me all giddy when I first saw it. :D I stamped the hydrangea with StazOn on Watercolor paper and then colored it in with Marina Mist (NEW!), Perfect Plum and Old Olive markers, followed up with blending with my Aqua Painter. I think that this color combo is going to be one of my "Go To" combos. I just love the look together. I distressed the edges of everything but the Top Note die cut, and finished up with SU's scrumptious satin ribbon in Old Olive.
Card Recipe:
Because I Care Stamp Set
En Francais Background Stamp
Perfect Plum and Marina Mist Cardstock
Watercolor Paper
Marina Mist, Perfect Plum and Old Olive Markers
Marina Mist and Perfect Plum Classic Ink
Old Olive Satin Ribbon
Big Shot Top Note Die
Big Shot Texturz Plates Backgrounds 1
Designer Label Punch
I hope you enjoyed this card!! Be sure to check back through next week's big Catalog Launch!!
Now, go get inky!!
 TAAAA-DDDAAAAAA!! OMG, I love the new stamp set Because I Care!! Do you love it? Well, it can be yours FREE, because it's one of the new Level 1 Hostess Stamp sets!! It made me all giddy when I first saw it. :D I stamped the hydrangea with StazOn on Watercolor paper and then colored it in with Marina Mist (NEW!), Perfect Plum and Old Olive markers, followed up with blending with my Aqua Painter. I think that this color combo is going to be one of my "Go To" combos. I just love the look together. I distressed the edges of everything but the Top Note die cut, and finished up with SU's scrumptious satin ribbon in Old Olive.
 Card Recipe:
Because I Care Stamp Set
En Francais Background Stamp
Perfect Plum and Marina Mist Cardstock
Watercolor Paper
Marina Mist, Perfect Plum and Old Olive Markers
Marina Mist and Perfect Plum Classic Ink
Old Olive Satin Ribbon
Big Shot Top Note Die
Big Shot Texturz Plates Backgrounds 1
Designer Label Punch
I hope you enjoyed this card!! Be sure to check back through next week's big Catalog Launch!!
Now, go get inky!!
Sunday, June 20, 2010
Happy Father's Day!
Happy Father's Day!! Now that the day has arrived, I can finally post the cards I made for all the Fathers in my life! I had a ton of fun doing these and trying to match them to each person and their personalities.
 The first up is my husband's. I literally jumped up and down when I saw the Motorcyle single stamp in the Summer Mini catalog. Both my husband and grandfather LOVE bikes, so I knew this stamp would be one of the first on my list. We also love the ocean, so I created and inkscape for his card.
 I wanted a completely different feel for my grandfather's card, especially since I was using the same stamp. This card was CASE'd from an awesome Demo, Becky Pressgrove. I loved her original so much, that I just had to put my own little spin on it. I used Crumb Cake, Brilliant Blue and Pumpkin Pie, which match up so nicely with the new Travel DSP in the Summer Mini catalog. I used my distressing tool around the edges of all the different layers to add depth and interest. And the circle brad adds just the right touch of "manly" bling. Love them? Make sure you snatch them up! They're on the Last Chance List for 50% off!!
 My husband's step dad is a SCUBA instructor, so I wanted to do another ocean theme card for him, but take it UNDER the water. I used glossy cardstock and my brayer to create the underwater scene and then added some whimsy with some die-cut fishies from my Cricut. I LOVE making easel cards! They're so easy peasy!!
 This is the card I made for my husband's dad. It's a non-SU stamp *GASP!* but I've had it forever and love the sentiment that it has. I used some retired DSP and some retiring ribbon (I will miss Bashful Blue ribbon!) to finish this card out.
I hope they all love them, and I hope you enjoyed them too!
Now, go get inky!!
Friday, May 21, 2010
May Sunday Scrappers Projects
Happy Friday Stampers!
Here's a sneak peak at what my Sunday Scrappers will be working on this Sunday! We're moving off the page and are doing some 3D projects and a card to match!
 Maybe it's the fact that I'm still giddy about our upcoming trip to Maui, but I am in love with everything on pages 26-27 from the Summer Mini!! All the coordinating Tropical products just speak to me. My customers have expressed their love as well, so we get to play with them this month! Here is our card, using the Tropical Party stamp set, Island Oasis Designer Series Paper, Old Olive Cardstock and Ink, Rose Red, Tempting Turquoise and Pumkpin Pie inks, the Top Note Big Shot Die and the Warm Words stamp set. I'll let my customers choose their sentiment from several that I have on Sunday, to personalize it, just for them. :)
 In my May workshops, I used the Top Note die and the 3x5 celophane bag as the baggies for my door prizes, and they were a hit! Sooo, here's a class on how to make them! Here we used the Island Oasis DSP again, the Top note die and Whisper White grosgrain ribbon. I designed the bag to open without getting destroyed AND it's reusable! I'm super excited to share this one on Sunday!
 My favorite project by far! I learned how to do this from several tutorials on the Stampin' Up Demonstrator message boards (THANK YOU LADIES!!), and I wanted to share it with my customers! We should almost call this class a Top Note Die class, since we'll be using it three different ways!
I hope you enjoy! Go get inky!!
May Worskhop Projects
Hi Stampers!
How are YOU celebrating National Scrapbooking Month? Oddly, I'm celebrating by doing everything but scrapbooking! LOL! Check out the projects from my latest May workshops!
 My May hostess LOVED the cute little bag in the Summer Mini, so I tweaked it and made it my own. This uses Brilliant Blue Cardstock and Ink (retiring), Real Red Ink, Red Gingham Ribbon, our 3x5" celophane bags, the large star punch and the new July Fourth stamp set in the Summer Mini!
 Of COURSE we made a card to match! This was also tweaked from the Summer Mini featured card. Same supplies, but we also added Kraft cardstock for the card (soon to be called Crumb Cake, YUM!), Whisper White Craft Ink, and the Large Oval punch.
 I simply adore the King of the Grill stamp set in the new Summer Mini catalog! This image just makes me giggle. This card uses Old Olive, Chocolate Chip and Brocade Blue (retiring) cardstock, SU Marvelous Markers, and the brand new Smooch Spritz in Log Cabin and Vanilla Shimmer. Also used was Brocade Blue ribbon (retiring), Chocolate Chip Ink and the Modern Label Punch.
We had so much fun!! Here's hoping you can join us in the near future, or are at least inspired to get inky!!
Saturday, May 8, 2010
Happy Mother's Day!
Has it really been over a month since I last posted? My goodness, how time flies.
Things have been super busy at home and with "the real world", and it saddens me that I haven't had dedicated time in the Scrap room like I would like. The launch of a new Mini catalog, the Color Renovation and the upcoming new Idea Book and Catalog for Stampin' Up definitely has us demonstrators busy busy bees, and we can't wait to show you some of our new goodies. :) I'll be posting some projects for upcoming workshops and classes in the next day or two, so stay tuned!
Now, on to the goodies for today! I FINALLY made it back into my Scrap space to get inky (;D) making Mother's Day cards for my mom and Mother in Law. Both cards were inspired by the fantastical Michelle Zindorf at http://zindorf.blogs.splitcoaststampers.com. I hope to one day be half as awesome as she is....
 This is my card for my mom. She loves the water and birds, and I've always wanted to try the Reflection technique, so I went for it! I used SU glossy cardstock, a brayer, and stamps from Branch Out (retired) and Wonderful Favorites to create this card.
 I love EVERYTHING in the new Summer Mini catalog!! My absolute favorite is the Tropical Party stamp set, featured here, along with Well Scripted from the Occasions Mini. I also used glossy cardstock here - I find my best brayering results with glossy - NEW Pacific Point cardstock, and Creamy Caramel, Close to Cocoa, Bashful Blue, Tempting Turquoise, Brilliant Blue and Night of Navy inks for brayering and sponging. The black is Stayzon ink, dried with a heat tool to save time. I finished it up with the photo corners punch and silver brads. We're going to Maui in September with my in-laws, so I think she'll love the thought behind the card. :)
Hope you enjoy! I'll be back to posting regularly very soon! I promise!!
Monday, March 22, 2010
Sneak Peaks at 3/28 Sunday Scrappers Projects
Sneak Peaks!! Here are some hints at the design of our Progressive Scrapbook page project for this month's Sunday Scrappers class! I'll post finished project photos once class is over. :)


Sunday, March 7, 2010
Fun with Tess
I've been working on some cards for the newest Cards for Soldiers challenge, and this month's challenge is all for the girls, so I've been having fun with Tote-Ally Tess from SU's Occasions Mini. She is so fun, and I've been having a blast seeing what items we can put "in" her hand. These images use stamps from Picture This, the Level 1 Hostess Set in the same Mini, as well as flowers from Short & Sweet in the IB&C.
 I love how the images from Picture This work with our Build a Brads so perfectly!
 The background Designer Series Paper is all from the Welcome Neighbor paper pad you can get FREE with a $50 purchase now through March 31st with Sale-a-Bration!
 Hope you enjoyed these! I certainly had fun making them!
Thursday, March 4, 2010
Stampin' Up! Haitian Relief Efforts
Once again, Stampin' Up demonstrators have shown what Stampin' Up! is all about by making a difference in the lives of others.
Worldwide, Stampin' Up! demonstrators sold 13,587 of the I {Heart} Hearts stamp sets that were set aside for Haitian relief. For each of those sales, Stampin' Up! will donate $2 to the Red Cross' Haitian Relief and Development Fund. That's over $27,000 donated to people who desperately needed our help!
THANK YOU to everyone who bought a set and helped SU! make this donation. What an amazing company to give to current, important causes like this...and quickly, when help is needed the most. I feel truly blessed to work with a company that has such a large heart...
Sunday, February 28, 2010
Sunday Scrappers 2/28/10 Class Projects
These are the full cards from our Sunday Scrappers Class today! We tried fun inking techniques with sponging and brayers and had a blast! Details below!
 I originally saw the technique for this card here:
http://zindorf.blogs.splitcoaststampers.com/2009/12/18/i-heart-hearts-valentine-tutorial-288-and-blog-candy-friday/ and I absolutely fell in love with the idea! It is so easy to do and requires few supplies. The ladies were worried at first, but all their cards came out fabulously! (The butterfly is one of my absolute favorite die cuts, but is not SU.)
 This card uses SU! Glossy Cardstock, VersaMark ink, a brayer and your choice of ink pads. Another quick card that packs a big punch!
I originally saw the technique for this card here:http://zindorf.blogs.splitcoaststampers.com/2009/12/18/i-heart-hearts-valentine-tutorial-288-and-blog-candy-friday/ and I absolutely fell in love with the idea! It is so easy to do and requires few supplies. The ladies were worried at first, but all their cards came out fabulously! (The butterfly is one of my absolute favorite die cuts, but is not SU.)
 This card uses SU! Glossy Cardstock, VersaMark ink, a brayer and your choice of ink pads. Another quick card that packs a big punch!
 Next month's class (well, I guess THIS month, since it's only a few hours until March) is all about Scrapbooking and Progressive Scrapbook Pages! Look for sneak peaks to pop up soon!
Saturday, February 27, 2010
Sneak Peak!
Here are some sneak peaks at the cards we'll be doing in our 'All About Inking - Beyond the Basics' class tomorrow for our first Sunday Scrappers class! I'm so excited! Full cards will be posted tomorrow night after class!


Wednesday, February 17, 2010
Newest Cards for Cards for Soldiers
Here are my newest cards for the most recent Cards for Soldiers challenge on one of my favorite messageboards. I made these a little while ago, but haven't had a chance to post them since we've had a run of illness in the house. Things are finally on the mend, so here are my cards!
 These are done with the SU Chocolate Bunny and Well Spoken Stamps from the new Occasions Mini, both stamped in Chocolate Chip ink. The Scalloped Oval punch was also used. The papers are several from a mat stack I've had forever and am finally using up.
  Baroque Motifs really is my favorite stamp set, I think. There are so many things you can do with it! On this one, I sponged Bashful Blue ink around the edges to create a softer look for Easter.
 Another Chocolate Bunny! This one uses paper from the Sale-A-Bration Good Neighbors paper stack. You can get this paper stack FREE with a $50 purchase during Sale-A-Bration, now through March 31st.
 I had so much fun with this Mother's Day card! I used the Greenhouse Garden and Well Spoken Stamp sets, and it was my first chance to play with my Stamp-a-ma-jig and try out Two Step Stamping! It was great! I loved being able to know exactly where my darker image would stamp over the lighter one. Colors used were Melon Mambo, Rich Razzleberry and Always Artichoke. I punched a couple labels with the Modern Label Punch and curved them over the edges of the card, and used a sponge dauber to ink the edges of the card in Always Artichoke.
I hope this inspires you to get crafty!!
Sunday, February 14, 2010
Best Quote I've Seen In a While...
I saw a very cool quote online the other day that I wanted to share. I've googled it, but I have yet to find the original author of the quote to give credit, but I wanted to share it all the same. It really reminds me why I do what I do...
"A birth certificate shows that you were born. A death certificate shows that you died. A completed scrapbook shows that you LIVED."
Capture the moment...
"A birth certificate shows that you were born. A death certificate shows that you died. A completed scrapbook shows that you LIVED."
Capture the moment...
Monday, February 8, 2010
Tutorial Tuesday Part 2!
Now, if you're like me and love, love, LOVE the new Clear Mount Stamps that Stampin' Up! has been offering in the new Occasions Mini Catalog, you might have been wishing and hoping that SU! would offer their older wood mount stamps in Clear Mount too. While I can't jump up and down for joy on that front just yet (my fingers are crossed!) I can share with you a super cool way to make your current wood mount stamps into a similar version of Clear Mount! What's so neat about this, is that it works on brand new unmounted stamps as pictured below, AND on stamp sets that you've already mounted to the wood blocks.
For the already mounted ones, just pop the whole block into the microwave for between 10-30 seconds to loosen up the glue, peel the stamp (with foam still attached) and the label off the block and then follow the steps below!
 Here's all you need! (Minus the Microwave for the already mounted stamps, of course. Didn't want to lug that in from the kitchen. ;) ) Your Wood Block Stamps - we used A Flower for Every Season here, your Tombow Multi Purpose Glue, and your preferred storage method. I have pictured both CD cases and the new SU! Clear Mount Cases, which can be purchased empty in packs of 4.
 For all you new stampers out there, this is what's in the cool little clamshell that your wood mount stamps come in. You get your stamps attached to sticky-backed foam, corresponding labels, and blocks to attach everything to. At this point, you can set your wood blocks aside. (I give them to my son for building blocks - also known as items to throw at the dogs, even though he's been told explicitly not to do that...)
 Your stamps come die cut, that means no cutting foam and rubber for you! Simply pop your stamp out of the foam sheet, and you're ready to begin!
 Peel the protective sheet off the sticky back of the foam, and find the corresponding label.
 Take the label and position it over the foam. Try to line up the image as best as possible so it's straight when you're looking at it through the clear block.
 The labels are square shaped to fit the wooden blocks, so you'll need to trim them down to match the edge of your stamp. Some use a hobby blade, but I feel I have more dexterity with my paper snips.
 Apply a dot of Tombow multi purpose glue to the back of the stamp over the index label. Tombow is multi purpose in that if an item is stuck down when the glue is wet, it's a permanent bond. However, if the glue is allowed to dry, the glue becomes repositionable, allowing you to stick your stamp to a clear block or a cd/dvd storage case repeatedly!
 I use a paintbrush to spread the glue over the stamp evenly. Then just let the glue dry (I like to do it overnight) and then you're ready to store and use (!) your stamps! If you find that your stamp is TOO sticky, stick it to your hand or jeans a couple of times to dull the stickiness. You can "restick' your stamps if you ever need to. I have sets that I've had forever and I've never had to reapply the glue.
 About storage, you can store your stamps in full-size CD cased (not the slimline ones) by taking out the center section of the case that the CD clicks into. Then make an index card for the front of the set, and attach your included SU! Set name label to the edge of the case, or you can store them in the new empty clear mount cases from Stampin' Up!
 As you can see, some sets are too large to store in one CD case, and this is when the DVD cases come in really handy! You can also create index label covers for these cases as well.
Some Tips for already mounted stamps:
- The longer your stamps have been mounted to wood, the longer you will need to run them in the microwave to loosen the glue. I haven't had to run one longer than about 35 seconds though.
- If you do use the microwave for this, make sure you use it with the mentality of someone popping popcorn. DO NOT walk away from the microwave while doing this, and only turn it on for about 10-15 seconds at a time.
- You are heating wood, so it will get warm to the touch, so please use caution while handling them.
- If the stamp has been mounted a long time, your foam MAY peel off unevenly. This is okay, I promise. At that point, you can peel the foam off of your rubber stamp entirely, and then just apply the label and glue to the rubber directly. This is what many do with bare rubber stamps, and it won't hurt your stamps or the images you stamp with them.
I hope this helps you all enjoy rubber stamping even more, and that it lets you see our stamp sets in new ways. Stampin' Up stamp sets really are customizable to fit your way of stamping and crafting!
Happy crafting!!
Subscribe to:
Posts (Atom)


